Download

1 / 23
230 likes | 345 Views
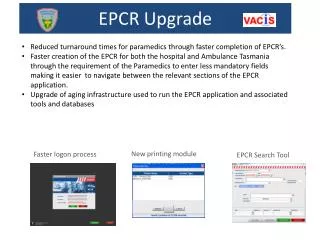
ePCR 5.1 Upgrade Overview. CCCEMS Update on Documentation Requirements and Helpful Hints 4 th Quarter 2009. Crew Login Screen . You must now have a password to open the program, the default will be 12345 for all. It will be changed at your request.

E N D
ePCR 5.1 Upgrade Overview CCCEMS Update on Documentation Requirements and Helpful Hints 4th Quarter 2009
Crew Login Screen You must now have a password to open the program, the default will be 12345 for all. It will be changed at your request.
Initial Screen, with no crew created. Click on Current Crew for Setup.
Is the system connected? The Globe at the bottom will have either aGreen “+” - Connection is goodABlue Exclamation “!” – you are signed in somewhere else?or a Red “X” – The network connection is broken? You can now minimize the screen!
Select “Add” This Pop-up Screen will appear – Click “OK”
This area is basically the same as 4.04 with some additional choices for the crew type and functions.
Each Crew Member must have Separate Role – This can be edited in the program for interventions – or changed at each call.
This shows a correct crew configuration – Up to 8 crew members can be added – The new configuration will allow 4 The Vehicle number will be by Station Only, Unit call sign will be Vehicle Radio Name Click OK when crew is correct
The new crew will show here – Highlight the desired crew if more than one is showing; then click on “Set As Current” This is also where you would “Add” / “Edit” & see “Details”
Inbox with crew assigned: All pending PCR’s will show up automatically by Vehicle assigned to crew. Or the PCR’s you have checked out but not completed. Any call routed in workflow will also show up in Pending PCRs. Once you check it out no one else can see or work on that PCR Only check one at a time to work on! Click on Save to Server when leaving the program
Information on Checking out PCR’s Once a PCR is checked out to you it will no longer be visible to anyone else for that vehicle login as a Pending Call. Every Apparatus that goes on scene will have to complete a PCR – short version if you did not render care. This is a county mandate per policy 27 (actually a relaxed policy for only at a scene required documentation of the EMS response – refer to policy if further info needed) it will remain in the inbox as incomplete until action taken. If you save it back to the server the other crew members will also have it in there Inbox and can check it out to work on or complete it. If you accidentally check out a PCR you will have to “Move” it to the correct person. You cannot delete a PCR from the System Save to Server when Leaving the Program!!!!!!!!!!!!!
To check out a PCR; Highlight and Check the appropriate call, then click on “Request PCR”
The call will populate to the inbox; highlight and check to select the appropriate call. You can now “Open” it; “Add a Patient” or “Move” it by selecting one of the Tabs. If you have to exit the program “Save to Server” and “Exit”. It will also popup a screen reminder
The “Merge” feature allows you to start a PCR without CAD information (System down, Etc…) When you start the PCR do not enter any of the demographic information (Times, Location, Unit Info) when the CAD information is available you can request the call to the inbox with the PCR you have started. Those should be the only 2 in the inbox. Highlight and check both of them – select “Merge” it will combine the calls with the times and call information
If you try to check out a PCR that someone else has already checked out and not saved back to server the Messages tab will turn Orange to alert you of the status. Click on it to see message
If you attempt to check out a PCR that someone else has already checked out this is the message. There may be admin messages here as well. If it’s glowing orange you have a message. Click on “Clear Messages” when done
To Move a PCR to someone else, after highlighting the call in the checked out PCR section and using the “Move” tab this screen will appear. You can either choose the “Move” if on a current crew on the program. Or “Transfer PCR” where you can move it to anyone on the system (All Company Agencies) Highlight the Person and select “Move”
“Add Patient” is still the same; this is the only time you can delete a PCR. If you accidentally add a Patient you can delete it. This only gives the demographics (Times,Incident, Etc…)
What the new screen looks like when you open a PCR. Some minor changes to the Tabs down the side. Additional fields to Patient Tab – Some of the new fields may be removed
Changes to Subjective Area “Cause of Injury” instead of “Mechanism” Nemsis Mech. of Injury – Program is set up for Nemsis Reporting (Gold Certified)
Changes to Objective Area The Cardiac Arrest Tab is a detailed reporting area.
Changes to Review Area You can now edit the crew for the call in this tab – you can change their “Role” without going to inbox. You can View Monitor Uploads from this Tab