Download
1 / 1
10 likes | 14 Views
Quick Install Guide-Wide Screen Display

E N D
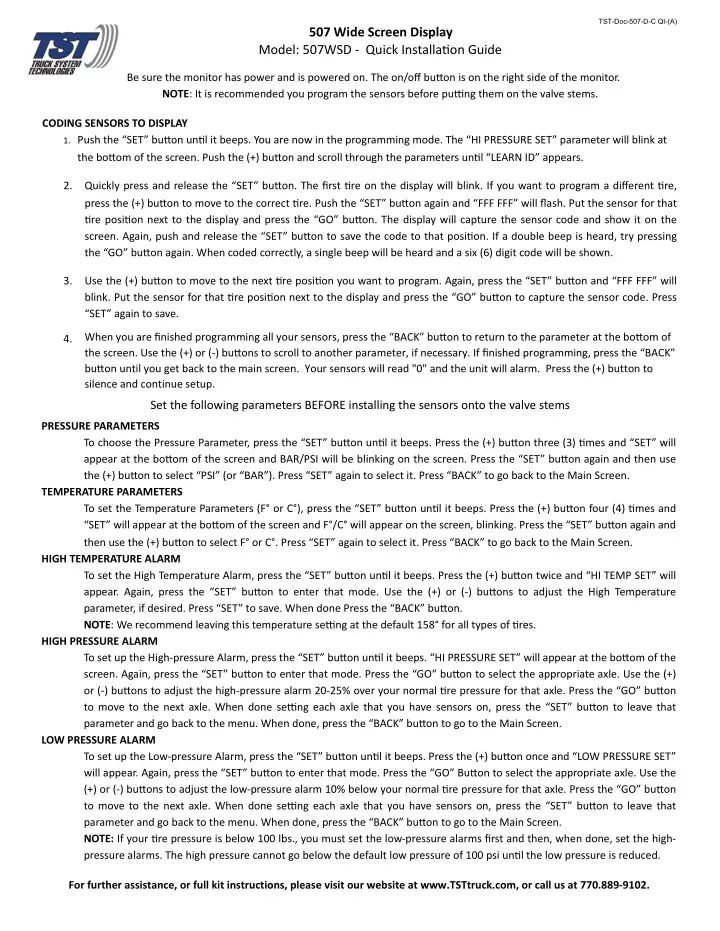
TST-Doc-507-D-C QI-(A) 507 Wide Screen Display Model: 507WSD - Quick Installa9on Guide Be sure the monitor has power and is powered on. The on/off buFon is on the right side of the monitor. NOTE: It is recommended you program the sensors before puJng them on the valve stems. CODING SENSORS TO DISPLAY 1. Push the “SET” buFon un9l it beeps. You are now in the programming mode. The “HI PRESSURE SET” parameter will blink at the boFom of the screen. Push the (+) buFon and scroll through the parameters un9l “LEARN ID” appears. 2. Quickly press and release the “SET” buFon. The first 9re on the display will blink. If you want to program a different 9re, press the (+) buFon to move to the correct 9re. Push the “SET” buFon again and “FFF FFF” will flash. Put the sensor for that 9re posi9on next to the display and press the “GO” buFon. The display will capture the sensor code and show it on the screen. Again, push and release the “SET” buFon to save the code to that posi9on. If a double beep is heard, try pressing the “GO” buFon again. When coded correctly, a single beep will be heard and a six (6) digit code will be shown. 3. Use the (+) buFon to move to the next 9re posi9on you want to program. Again, press the “SET” buFon and “FFF FFF” will blink. Put the sensor for that 9re posi9on next to the display and press the “GO” buFon to capture the sensor code. Press “SET” again to save. When you are finished programming all your sensors, press the “BACK” buFon to return to the parameter at the boFom of the screen. Use the (+) or (-) buFons to scroll to another parameter, if necessary. If finished programming, press the “BACK” buFon until you get back to the main screen. Your sensors will read "0" and the unit will alarm. Press the (+) button to silence and continue setup. Set the following parameters BEFORE installing the sensors onto the valve stems 4. PRESSURE PARAMETERS To choose the Pressure Parameter, press the “SET” buFon un9l it beeps. Press the (+) buFon three (3) 9mes and “SET” will appear at the boFom of the screen and BAR/PSI will be blinking on the screen. Press the “SET” buFon again and then use the (+) buFon to select “PSI” (or “BAR”). Press “SET” again to select it. Press “BACK” to go back to the Main Screen. TEMPERATURE PARAMETERS To set the Temperature Parameters (F° or C°), press the “SET” buFon un9l it beeps. Press the (+) buFon four (4) 9mes and “SET” will appear at the boFom of the screen and F°/C° will appear on the screen, blinking. Press the “SET” buFon again and then use the (+) buFon to select F° or C°. Press “SET” again to select it. Press “BACK” to go back to the Main Screen. HIGH TEMPERATURE ALARM To set the High Temperature Alarm, press the “SET” buFon un9l it beeps. Press the (+) buFon twice and “HI TEMP SET” will appear. Again, press the “SET” buFon to enter that mode. Use the (+) or (-) buFons to adjust the High Temperature parameter, if desired. Press “SET” to save. When done Press the “BACK” buFon. NOTE: We recommend leaving this temperature seJng at the default 158° for all types of 9res. HIGH PRESSURE ALARM To set up the High-pressure Alarm, press the “SET” buFon un9l it beeps. “HI PRESSURE SET” will appear at the boFom of the screen. Again, press the “SET” buFon to enter that mode. Press the “GO” buFon to select the appropriate axle. Use the (+) or (-) buFons to adjust the high-pressure alarm 20-25% over your normal 9re pressure for that axle. Press the “GO” buFon to move to the next axle. When done seJng each axle that you have sensors on, press the “SET” buFon to leave that parameter and go back to the menu. When done, press the “BACK” buFon to go to the Main Screen. LOW PRESSURE ALARM To set up the Low-pressure Alarm, press the “SET” buFon un9l it beeps. Press the (+) buFon once and “LOW PRESSURE SET” will appear. Again, press the “SET” buFon to enter that mode. Press the “GO” BuFon to select the appropriate axle. Use the (+) or (-) buFons to adjust the low-pressure alarm 10% below your normal 9re pressure for that axle. Press the “GO” buFon to move to the next axle. When done seJng each axle that you have sensors on, press the “SET” buFon to leave that parameter and go back to the menu. When done, press the “BACK” buFon to go to the Main Screen. NOTE: If your 9re pressure is below 100 lbs., you must set the low-pressure alarms first and then, when done, set the high- pressure alarms. The high pressure cannot go below the default low pressure of 100 psi un9l the low pressure is reduced. For further assistance, or full kit instructions, please visit our website at www.TSTtruck.com, or call us at 770.889-9102.