Download

1 / 16
160 likes | 391 Views
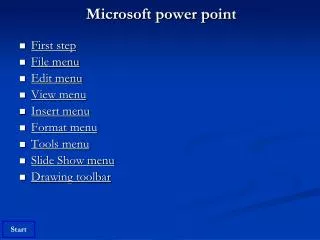
Michaela and Robert’s Wedding Menu. Deadline: emailed to Lois Mills, Wedding Planner at vxgstaff@hotmail.co.uk By Monday 8 th October 2007. Unit 1 Assessment Objective 4. > >. End. Contents. What You Have to Do Sample Menu Designs Menu Items Help to Create Your Wedding Menu

E N D
Michaela and Robert’s Wedding Menu Deadline: emailed to Lois Mills, Wedding Planner at vxgstaff@hotmail.co.uk By Monday 8th October 2007 Unit 1 Assessment Objective 4 > > End
Contents What You Have to Do Sample Menu Designs Menu Items Help to Create Your Wedding Menu A Few Reminders > > End
What You Have To Do Contents • Look through the different designs for wedding menus • Use the images you see to on the next few slides to help you design your own wedding menu for Robert and Michaela’s big day. • Remember: • Make the menu suitable for a wedding at the 5 star hotel, Cofa’s Tree Hotel, Function Centre & Spa. • Use the menu list that is at the end of this presentation. • Use the wedding colours: White, Gold and Purple • Use desktop publishing software (Publisher) or word processing software (Word) to complete this task. • If you want a Distinction DO NOT use a template from with the software. (top mark for a menu using a template is Merit) • The menu should be no longer than 4 sides long. < < > >
Contents One Page with three sides written on, then folded < < > >
Contents One Page, with Wedding information on the front and the Menu Choices on the back < < > >
Contents One Page, with Wedding information on the front and the Menu Choices on the back < < > >
Contents Single Page Menus < < > >
Contents Single Page Menus < < > >
Contents Booklet Style < < > >
Menu Items Contents Choose between 2 and 4 items for each course. Starters Go to the next slide >> < < > >
Menu Items Contents Choose between 2 and 4 items for each course. Main Course Go to the next slide >> < < > >
Menu Items Contents Choose between 2 and 4 items for each course. Vegetarian Main Course Go to the next slide >> < < > >
Menu Items Contents Choose between 2 and 4 items for each course. Dessert Go to the next slide >> < < > >
The Drawing Toolbars Contents WORD – to get the drawing toolbar to appear on the bottom of your screen: View - Toolbars - Drawing Here is the Drawing toolbar. To find out what the each picture lets you do, hold your mouse over it for a couple of seconds and it will tell you. Remember you click on the picture and then drag and draw the object on your page. The Drawing Toolbar in Publisher >> < < > >
The Drawing Toolbars Contents Publisher – to get the drawing toolbar to appear on the left hand side of your screen: View - Toolbars - Objects Here is the Drawing toolbar. To find out what the each picture lets you do, hold your mouse over it for a couple of seconds and it will tell you. Remember you click on the picture and then drag and draw the object on your page. < < > >
A Few Reminders! Contents More Pages – to get another page, choose Insert – Page – type in the number of new pages you want and click of After Current Page. Then click OK Saving Your Work – Remember to save your work very often. Name your menu, Wedding Menu Adding Pictures – to put a saved picture on to your menu, Insert – Picture – From File Or copy and paste it on to the menu. Remember: if you get a picture off a website, make sure you write down which website (and it’s web address) . If you don’t do this, you cannot use it in your work!! < < End