Download
1 / 31
340 likes | 647 Views
DC Motor Controller for Robotics. Alexander Gray Shaurya Mehta ECE 445 – Senior Design Group # 6 30 th November, 2005. Robotic manipulators and similar systems require precise and often relatively powerful drive motors and control systems

E N D
DC Motor Controller for Robotics Alexander Gray Shaurya Mehta ECE 445 – Senior Design Group # 6 30th November, 2005
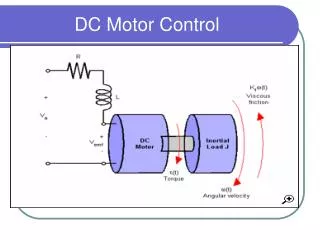
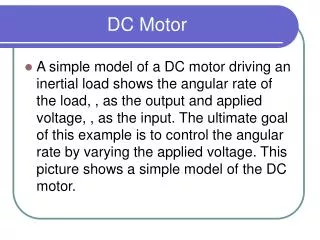
Robotic manipulators and similar systems require precise and often relatively powerful drive motors and control systems We aimed to create an easy-to-use drive module integrating the motor, power amplifiers, gearing, sensors and basic control functions, which can be interfaced to a PC Introduction
Fully integrated drive system including Motor, Drive Train, Power Electronics, and Control Logic User can control Velocity, Position or Torque Complete PC interface using HyperTerminal Input interface using the PC keyboard Sensor data output via HyperTerminal Goals & Objective
Approximately ~ 1.5 kW electrical output and ~ 1 kW peak mechanical output Protection circuitry against over-current, voltage spikes and noise from the motor Performance specifications
System Block Diagram 24V Power Supply Control Logic & PC Interface Unit DC Motor & Sensors Power Electronics Unit
MOSFET Driver: HIP4081A Power MOSFETs: STP140NF55 (2 per leg) Current Sensor: Allegro ACS755-100 DC Motor: DeWalt 18V Drill Motor Shaft Encoder: US Digital E4P Voltage Regulators: Micrel LM2575 buck converters System Hardware
Regulated 5 volt power for the logic circuits and 12 volts for the MOSFET gate driver IC is provided by Micrel 2575 buck converter IC’s with external inductors, diodes and capacitors. Each can supply 1A output, staying cool and efficient. The power input is filtered by a 3300 uF capacitor and a 60 V,1.5 kW transient voltage suppressor (TVS) diode. Interference and voltage spikes from the motor are blocked by two RC snubber and TVS diode sets. Power Supply & Circuit protection
The DeWalt drill motor and gearbox are rated for 18V, 450 RPM, and 450 oz-in. However, it is run at 24V, giving a max speed of 600 RPM, and momentary torque is achievable far over the rating without damage. The shaft encoder is a compact quadrature type, approximately 1” dia x 0.5” high with 256 pulses per revolution. It is operated at TTL logic levels, and was very easy to integrate. DC Motor & Shaft Encoder
The motor is driven by an H-bridge circuit, with two MOSFETs (55V, 80A, 8 mohm) per leg and large heatsinks (approx. 6ºC/W total) for a total current handling ability of at least 70A. The logic level PWM signals are converted to the necessary gate voltages by a HIP4081 full bridge driver IC. The gates are driven through 150 ohm resistors and reverse-bypass diodes for insurance against shoot-through, and Zener diodes protect the gates from voltage spikes. Power Amplifier Unit
The Brain of the DC Motor Controller Communicates with the PC via RS-232 interface Outputs 2 PWM signals to the MOSFET driver Completes the control loop by receiving signals from the: 1. Current Sensor – Torque Control 2. Shaft Encoder – Position & Velocity Control Uses PID controller algorithm to drive the motor System Software - PIC 18F452
Controller Algorithm • PID (Proportional, Integral, Derivative) Controller Target Value PID Controller Computed Signal “u” Motor & Sensors Error Actual Value
PC Interface • We use the UART module of the PIC to implement RS232 serial communications with the PC at 9600 baud. • To match the voltage levels we use a MAX-232 chip to connect to the PC serial port. RS232 Serial Communication MAX 232 PIC 18F452
The shaft encoder produces two out-of-phase pulse trains which are fed to an 8 bit up/down counter. The direction of rotation is determined by using a D flip-flop to detect the phase difference. The 8 bit counter output indicates the Motor position, with a resolution of 256 counts/revolution (1.4 degrees) Speed is measured by counting pulses for 100 mS, so that a count of 255 corresponds to the motor’s maximum speed of 600 RPM. Encoder Logic
We started of with a 8 bit PIC using a very basic control algorithm to drive the motor Initially the PC interface did not account for the conversion of numerical values to ASCII Once the basic functions were working, we improved the control algorithm and also added the ASCII conversion in the code. Ultimately we switched to a 16 bit PIC to incorporate a fully functional PID controller Software Evolution
The original motor required bulky and expensive gearing, so it was replaced with a drill motor and matched off-the-shelf gearbox. The original encoder was replaced with a much more compact and higher resolution model, and the associated logic went through several designs. Two MOSFET’s were placed on each heatsink instead of one, since only one MOSFET in each pair can be on at a given time. Hardware Evolution
Due to high current and voltages it was impossible to test the circuit on a breadboard Blew up a few MOSFETs in the process Had to wait for PCB to be ready to do any kind of testing, causing considerable down time In Torque control mode, we encountered a lot of noise from the current sensor Initially, the update frequency under torque control was too high for the current to stabilize. Challenges
Further tweaking of the PID controller could definitely improve the overall performance Find ways to eliminate noise in the circuit, such as better grounding practices Could use a DSP or analog system and a higher resolution encoder to allow a higher update rate and better accuracy Possible Improvements
During the Demo we encountered difficulties operating the torque mode, but we fixed the problem the next day In the end we met many of our proposed performance levels even though some of the goals were chosen near theoretical limits The complete circuit on a single PCB makes it a convenient, ready to use product Conclusion
Thank you all for your time today Thank you