Download
1 / 4
40 likes | 51 Views
You can send an Accountant's Copy (.QBX) by saving the file locally or using the Accountant's Copy File Transfer (ACFT) service. It is important that your accountant receives this file on time to ensure all changes or corrections are made on your company file.

E N D
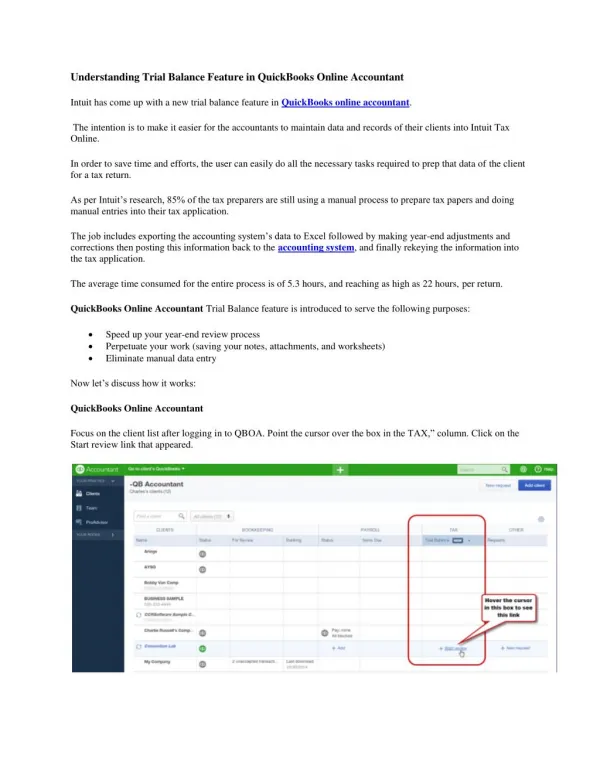
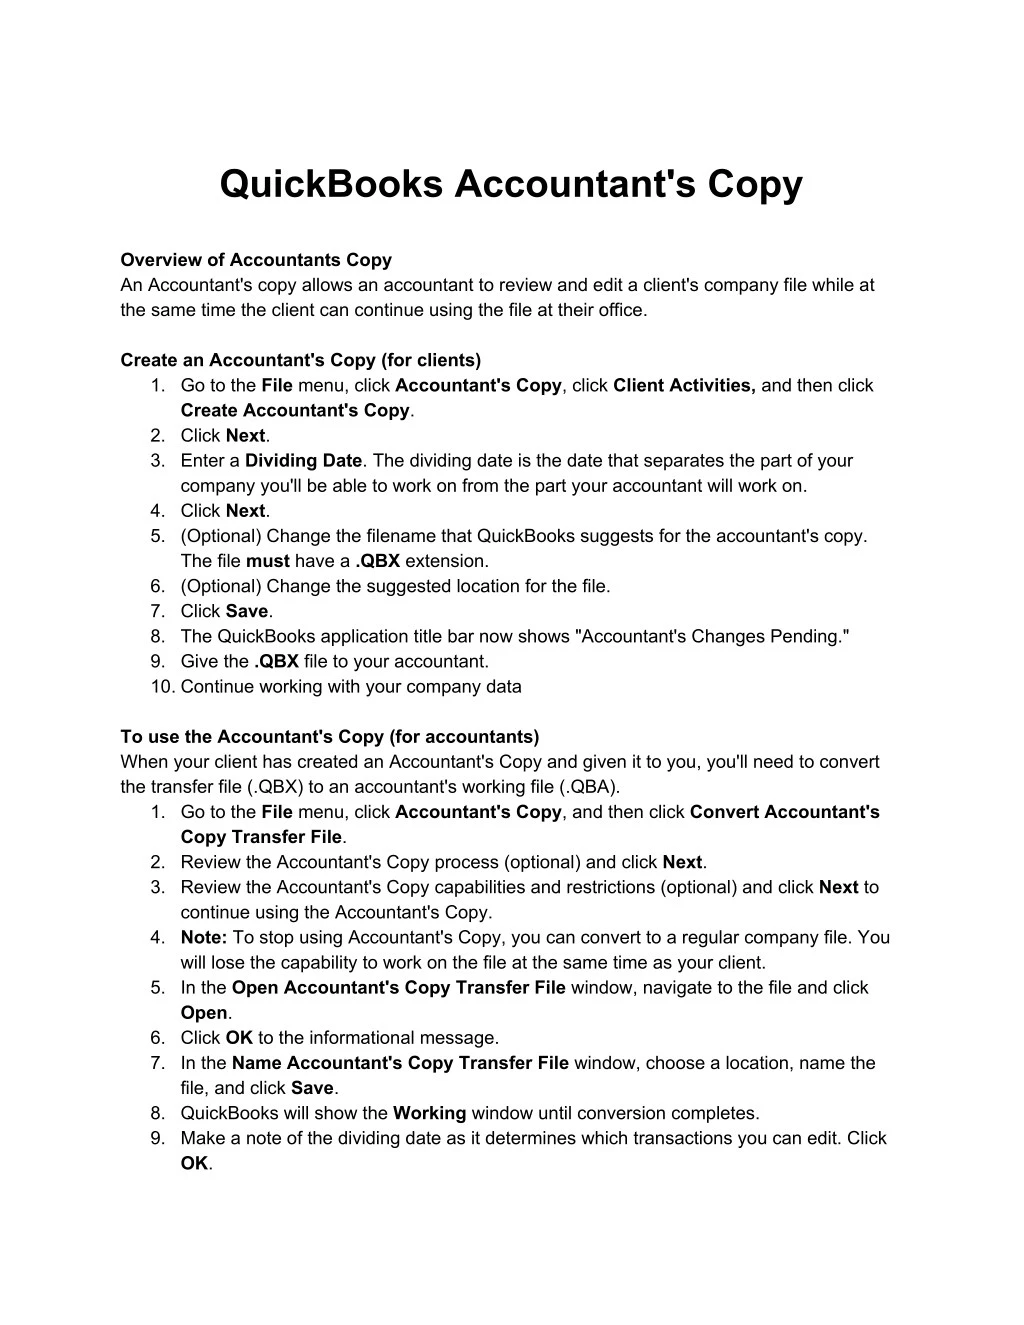
QuickBooks Accountant's Copy Overview of Accountants Copy An Accountant's copy allows an accountant to review and edit a client's company file while at the same time the client can continue using the file at their office. Create an Accountant's Copy (for clients) 1. Go to the File menu, click Accountant's Copy, click Client Activities, and then click Create Accountant's Copy. 2. Click Next. 3. Enter a Dividing Date. The dividing date is the date that separates the part of your company you'll be able to work on from the part your accountant will work on. 4. Click Next. 5. (Optional) Change the filename that QuickBooks suggests for the accountant's copy. The file must have a .QBX extension. 6. (Optional) Change the suggested location for the file. 7. Click Save. 8. The QuickBooks application title bar now shows "Accountant's Changes Pending." 9. Give the .QBX file to your accountant. 10. Continue working with your company data To use the Accountant's Copy (for accountants) When your client has created an Accountant's Copy and given it to you, you'll need to convert the transfer file (.QBX) to an accountant's working file (.QBA). 1. Go to the File menu, click Accountant's Copy, and then click Convert Accountant's Copy Transfer File. 2. Review the Accountant's Copy process (optional) and click Next. 3. Review the Accountant's Copy capabilities and restrictions (optional) and click Next to continue using the Accountant's Copy. 4. Note: To stop using Accountant's Copy, you can convert to a regular company file. You will lose the capability to work on the file at the same time as your client. 5. In the Open Accountant's Copy Transfer File window, navigate to the file and click Open. 6. Click OK to the informational message. 7. In the Name Accountant's Copy Transfer File window, choose a location, name the file, and click Save. 8. QuickBooks will show the Working window until conversion completes. 9. Make a note of the dividing date as it determines which transactions you can edit. Click OK.
Send the changes back to the client (for accountants) When you have made all of your changes to your Accountant's Copy, create an export file to give to your client: 1. Go to the File menu, choose Accountant's Copy, and then clickView/Export Changes for Client. 2. (Optional) Review the changes and add a note. Click Save Note. 3. (Optional) Click Print to print a copy of your changes. 4. Click Export. 5. In the Save Accountant Change File to window, enter the filename and location of the file you are about to create. The filename must have an .QBY extension. 6. Click Save. 7. Click OK in the QuickBooks Information window. 8. Give the export file to your client. Import the changes from the accountant (for clients) When your accountant returns the Accountant's Copy changes file to you, it will have an .QBY extension. 1. Open the master company file (the latest one that you have on your computer). 2. Go to the File menu, click Accountant's Copy, click Client Activities, and then click Import Accountant's Changes. 3. In the Import Accountant's Changes window, locate the accountant's changes file and click Open. 4. After reviewing your accountant's proposed changes, you can either accept all or none of the changes: Click Import to accept the changes, or click Close to reject them. Note: If you choose to reject your accountant's changes, be sure to communicate with your accountant about your next step, whether it means getting you a new changes file or cancelling the Accountant's Copy. 5. Click OK to the messages about backing up your data and closing all windows.Backing up is a safeguard in case anything goes wrong when you import the changes. 6. (Optional) If this is the first time you are making a local backup in QuickBooks, click Options to enter the filename and location for the backup file. 7. Complete the backup. 8. Review the import results for warnings of potential problems. 9. Print a copy of the import results. You will not be able to go back after closing the window. 10. Click Close. Cancel an Accountant's Copy If the Accountant's Copy is ever lost or becomes outdated, the client may choose to cancel the Accountant's Copy. 1. Go to the File menu, click Accountant's Copy, click Client Activities, and then click Cancel Accountant's Changes.
2. Type YES if you're sure you want to cancel. When working on a client's file, the QuickBooks version must be the same. For example, an Accountant's copy file created in QuickBooks 2016 can only be opened in QuickBooks 2016. The following is a list of different types of files by their respective extensions: ● .qbw - QuickBooks company data file ● .qbb - QuickBooks backup file ● .qbx - Client's copy for accountant ● .qba - Accountant's working copy ● .aif - Accountant's changes for client Create an accountant's copy to send to your accountant You can send an Accountant's Copy (.QBX) by saving the file locally or using the Accountant's Copy File Transfer (ACFT) service. It is important that your accountant receives this file on time to ensure all changes or corrections are made on your company file.
This article is part of a series about Accountant's Copy in QuickBooks Desktop. To know more about other Accountant's Copy workflows and general information, see Accountant's copy overview. Important: ● Advanced Inventory (AI) must be turned off in order to create an Accountant's Copy in QuickBooks Enterprise. If you are using Accountant's Copy File Transfer (ACFT)* service, your accountant has two weeks to download the Accountant's Copy you uploaded. If your accountant asked you to recreate your Accountant's Copy, you have to remove the accountant's copy restriction and recreate the file. Take note that once the restriction has been removed, you can no longer import the Accountant's Changes from the previous Accountant's Copy you created. The QuickBooks title bar will show "Accountant's Changes Pending" next to the company's file name until you import the Accountant's Changes or until you remove the restriction. PosTechie ● ● ● To create an Accountant's Copy (.QBX) 1. Go to the File menu, then select Send Company File. 2. Select Accountant's Copy > Client Activities. 3. If you want to save the file locally: a. Select Save File. b. Choose the appropriate location you want to save the file. 4. If you want to send the file using Accountant's Copy File Transfer (ACFT) service: a. Select Send to Accountant, then Next. b. Enter the dividing date, then Next. c. Enter your accountant's email address, your name, and your email address. d. Create and re-enter a file transfer password for security. If needed, you can also include a note to your accountant. e. Select Send. QuickBooks will then close all windows. We are PosTechie who work for QuickBooks Support, you can directly contact to our Quickbooks Proadvisor at 18009350532 which can support you manually or steps by steps.