Download
1 / 11
110 likes | 308 Views
This was an interesting project read all about how I built this for cheap.

E N D
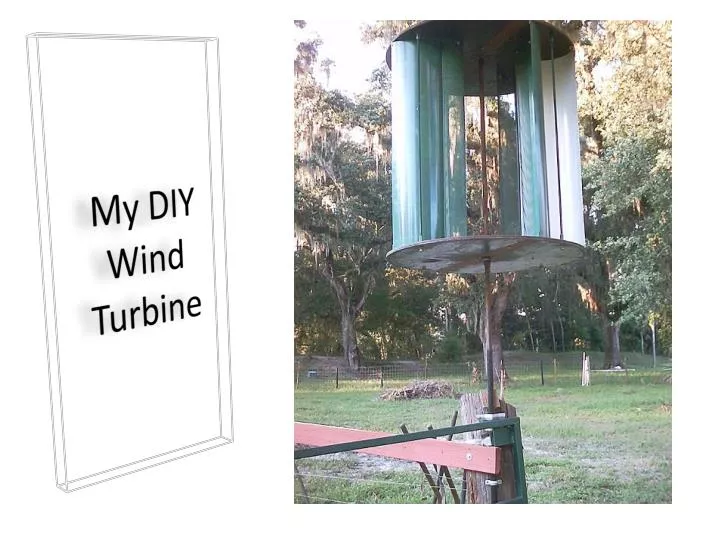
This is my project and it is not finished yet, but I figured I would show it to you. It can be done and sometimes cheap. First of all we will start off with the supplies a friend gave me. Most of them were free. His son worked construction and he was building a house and had lots of extra stuff left over and he wanted to get rid of it. So I helped him out. He gave me 30 - 8 foot 5/8 all thread some ¾ plywood and some kitchen lights. These are the ones that are 4 foot and recess into the ceiling. I paid for 2 bearings and the solid steel 10 foot rod. The real money comes when you make the generator but that’s the part that isn’t done.
Let me tell you how I constructed this out of those parts in our list above. The picture is above so you can see it as we are going through the steps. Step one was preparing the plywood. We need two round circles to start with.
Trick here on how to get them both the same. You need a table saw for this and you need to find the center of your plywood. You should also make the marks for the blades this is easier when the plywood is square. If you have 6 blades you need 6 marks should look like a pie with 6 evenly cut pieces. The more blades the smaller the pieces of pie. This really needs to be done right for balance. These marks are for the positioning of the blades so the marks need to be made on the inside top and bottom when the project is put together.
My plywood was already 4.5 x 4.5 when I started. Now you need to make a hole in the table saw (I had to add extra table panel on mine to use all the wood) about dead center of the blade. If the hole is 2 feet from the saw blade you should get a 4 foot round circle
First take off the guard and lower the blade all the way down. You hold it down with some all thread or 4 to 5 inch bolt and I used a weight from an old weight bench and some washers and nuts. Put the plywood with the hole in it and put the bolt with a washer down through the weight then the plywood then the table saw. Now put the washer and nut on. Do not make this too tight! The idea is to roll the plywood round and round until we get a circle.
Best results you need a very good blade or new. Warning: TAKE YOUR TIME!!!!! You just raise the blade a little at a time. Start very small to get a feel for it and spin the plywood slowly. Keep your hand away from the blade but firm on the board. Should look like this when you’re done.
Now put the two round circles together and mark your hole for the all thread to hold the turbine together I used 5/8 all thread. Remember they were 8 foot so I cut them with a chop saw and use a die to clean up the thread. I used 4 of them. Also you need to mark the side with a “V” so you know what is top and bottom. If you use the V method then you will always be able to match them. These holes need to be fairly perfectly placed for balance.
It’s coming together now you will need nuts on both sides to lock it in. I bolted the bottom together first put the top on loose. I bet you are wondering where the recessed lights come into the turbine project. In the light there where two nicely shaped, rounded pieces of metal and two diffusers prefect for our blades. You will have to work on the next part, moving the blade around. The way I did was if you ever saw a blower cage or look at my turbine at the top to get an idea.
Once you get where you want it then from the marks you made you should be able to duplicate the rest so they are all the same. I used small L brackets and screws to hold it together. Then tighten all the nuts up remembering about balance. Try to get everything the same your blades and the all thread. I started the all thread at the very bottom of the nut (flush). When you cut the all thread all should be the same length. If you really want to get technical you can weigh them. Also I doubled the nuts for security reasons.
Final thing is to get the bearings in straight. I only used a 1 inch solid rod I am going to go 1 ¼ 80 grade pipe with some stronger bearings. I hoped you like this article and hoped the pictures will give you some ideas on some junk your friend might have that you could put to use to make a wind turbine. I will keep you informed on the rest of the project as it comes along. Find out more about wind turbines here. • http://www.windturbinesprosandcons.com