Download
1 / 2
20 likes | 28 Views
VORTEK SS PRIMING <br> INSTRUCTIONS <br>Priming Instructions <br>1. Set the 3 valves to the BACKWASH position on the valves. Reu0002member: the valve shuts off the pipe that the pointer, not the hanu0002dle, is pointing at. This means in Backwash/Priming position the <br>Valve #1 pointer should be pointing at the Vortek SS tank. Valve #2 <br>should be pointed away from the bypass line. On the Mashimizu <br>system the pointer would normally be pointed towards the front of <br>the system which opens up the bypass line. Valve #3 would be <br>open for backwash/priming when the pointer was pointed cross <br>wise like the photo above

E N D
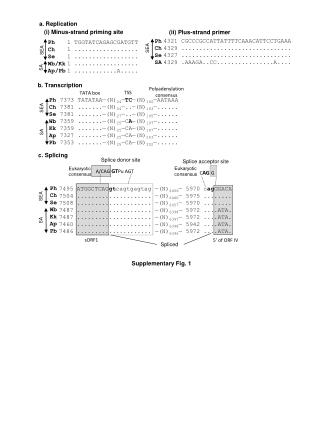
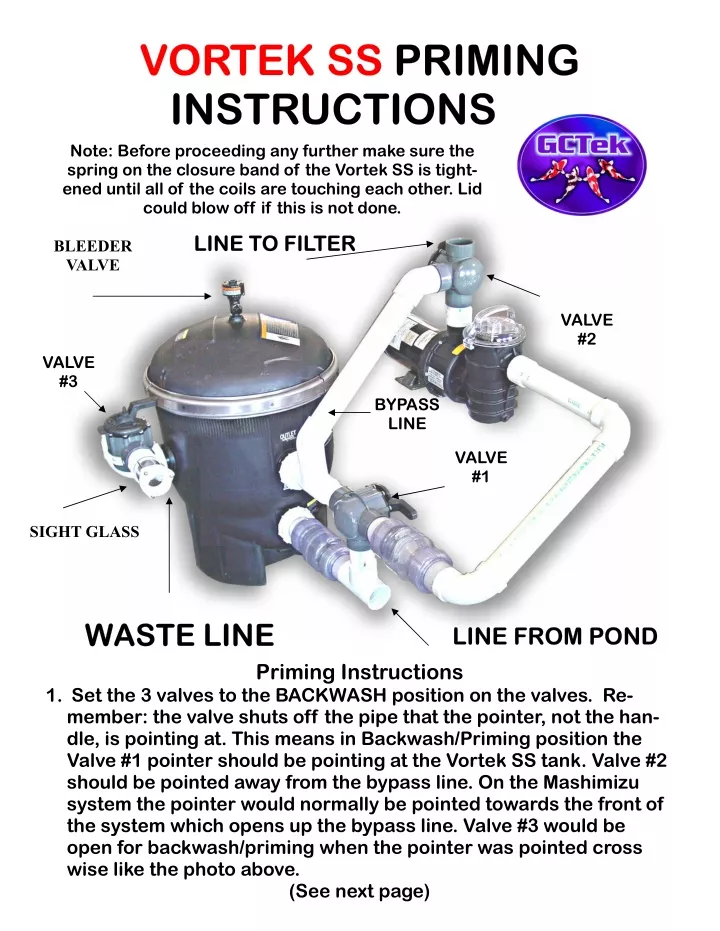
VORTEK SS VORTEK SS PRIMING INSTRUCTIONS INSTRUCTIONS Note: Before proceeding any further make sure the spring on the closure band of the Vortek SS is tight- ened until all of the coils are touching each other. Lid could blow off if this is not done. PRIMING LINE TO FILTER LINE TO FILTER BLEEDER VALVE VALVE #2 VALVE #3 BYPASS LINE VALVE #1 SIGHT GLASS WASTE LINE WASTE LINE LINE FROM POND LINE FROM POND Priming Instructions 1. Set the 3 valves to the BACKWASH position on the valves. Re- member: the valve shuts off the pipe that the pointer, not the han- dle, is pointing at. This means in Backwash/Priming position the Valve #1 pointer should be pointing at the Vortek SS tank. Valve #2 should be pointed away from the bypass line. On the Mashimizu system the pointer would normally be pointed towards the front of the system which opens up the bypass line. Valve #3 would be open for backwash/priming when the pointer was pointed cross wise like the photo above. (See next page)
2. Fill pump strainer basket with water and allow water to go into the pipe- work of the system until the strainer will hold no more water. Replace pump lid. 3. Start pump and run until water comes out waste line. Open air bleeder valve on top of filter and close WASTE LINE VALVE (Valve #3). When water comes out of the air bleeder valve the unit is full of water and primed. Close bleeder valve. Stop pump. 4. Set the Valve #1 and Valve #2 to FILTER and restart pump. Filter position for Valve #1 is with the pointer pointing down and with Valve #2 pointing at the bypass pipe. Please take the time to follow the directions carefully and your system should backwash/prime easily for you. Put these directions in an easy to access place where you can refer to them the first time or there after that you prime the unit. At the time you acquired your Vortek SS prefilter it came with an extra swing check valve. If this wasn’t installed you will have difficulty back- washing your system. Do not attempt to operate until it is installed prop- erly which is on the intake line into the Vortek SS below pond surface grade. grade. If you have questions feel free to give us a call and we’ll be Happy to help. 866-712-7007 below pond surface