Download
1 / 17
170 likes | 181 Views
We all want to maintain the radiant smiles we have had since our youth. However, over time, teeth may yellow or discolor depending on natural factors or lifestyle choices. Fortunately, teeth whiteners help restore some of this luster back and regain our confidence to smile again. <br><br>Table of Contents<br><br> Take-Home Teeth Whitening.<br> Why teeth whitening is important? <br> Things to consider when going for teeth. whitening.<br> Take Home Teeth Whitening.<br> The Procedure.<br> Some Downsides to Note .<br> In-office Teeth Whitening.<br> Downsides

E N D
Table of Contents • Take-Home Teeth Whitening. • Why teeth whitening is important? • Things to consider when going for teeth. whitening. • Take Home Teeth Whitening. • The Procedure. • Some Downsides to Note . • In-office Teeth Whitening. • Downsides.
Take-Home Teeth Whitening In-house and take-home teeth whitening are available dental procedures for brightening dull or stained teeth. However, which of these two methods is more cost-effective for you and how long does it take to see results? Well, here is a quick guide to help you out.
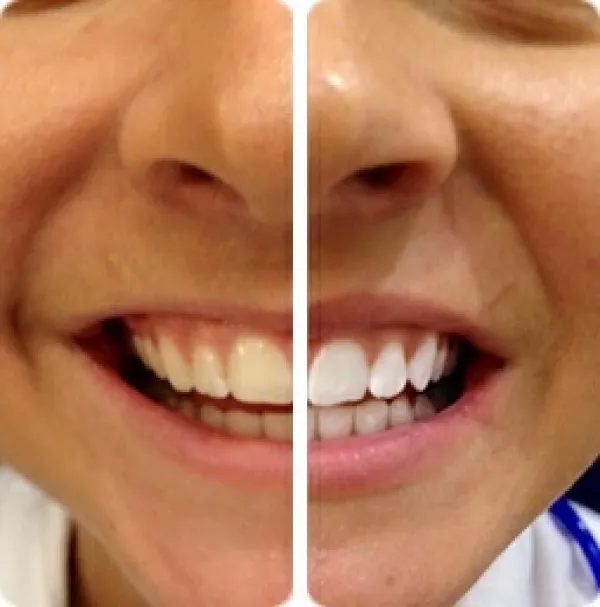
Why teeth whitening is important? We all want to maintain the radiant smiles we have had since our youth. However, over time, teeth may yellow or discolor depending on natural factors or lifestyle choices. Fortunately, teeth whiteners help restore some of this luster back and regain our confidence to smile again. Teeth may yellow or darken due to the frequent use of tobacco, consuming dark colored vegetables like beet, or drinking caffeinated beverages like coffee and tea. Dark colored fruits like berries and grapes may darken teeth as well. Frequent consumption of wine (which made from grapes) also contributes to discolored teeth. When discoloration occurs, teeth whitening present a ready solution for brightening a dark smile. This procedure can either be done at the dentist (In-house) or at home (take-home) using easy-to-follow instructions. The option you go for will depend on several factors which we will outline below.
Things to consider when going for teeth whitening Teeth whitening is a popular dental procedure that is recommended for both young and old people. There are many ways to whiten the teeth and each will be recommended on different teeth types. Here is what you should know when going for a teeth whitening procedure. • Cost How much are you willing to pay at your dentist to get your teeth whitened? Some teeth whitening procedures can cost as low as $10 while others can fetch a whopping $700 a session. A professional dentist can help you choose which teeth whitening method is best for you based on your teeth profile. • Safety Some teeth whitening regimes use strong chemicals that can be harmful in the wrong hands. It is safer to have the procedure done in a dental clinic where the environment is more controlled and the dentist on call is experienced. On the other hand, if you do wish to buy over-the-counter whitening products, ensure you read the ingredient label carefully. A dentist can help you decide which product to buy over-the-counter once they evaluate your teeth.
Urgency How soon do you want to start seeing the results of the teeth whitening session? There are teeth whitening solutions that work instantly while others may take up to two weeks to work. Some whitening solutions only need one application while others. • Time How much time can you dedicate to the teeth whitening sessions? There are whitening procedures that only take 30 minutes and you are done. Others require you to dedicate a few hours to get the bleaching process done right. Teeth whitening solutions that require several applications will definitely take more of your time before results are seen. • Comfort You also have to think about your comfort when choosing a teeth whitening solution. You could walk into a dental clinic and persevere through a few minutes and you are done. Other teeth whitening solutions may involve feeling uncomfortable in the mouth throughout the day.
Take Home Teeth Whitening Just as the name suggests, this method involves buying a bleaching kit and whitening your teeth at home. There are two options for at-home teeth whitening. One is by buying an over-the-counter teeth bleaching kit and following the instructions at home. The other option is getting your at-home teeth whitening kit from a professional dentist. Over-the-counter teeth whitening kits are cheaper and cost between $20 and $100. The bleaching agent used here is a mild one and results will start showing after a month or two. This would be a viable option if you are finances are tight and you need a quick teeth whitening solution. The downside is that over-the-counter kits tend to be experimental and anything can go wrong if you do not follow or fail to understand the instructions on the product packaging. A safer bet is by getting your take-home teeth whitening kit from a professional dentist. Professional whitening kits use a much stronger solution that yields results faster. In addition, you first have to get examined by a trained dentist before they recommend a teeth whitening kit to you.
The Procedure Your dentist will first examine your teeth to determine the cause and degree of discoloring. The dentist will record the current shade of your teeth and will use this to track your progress over the course of the treatment. After the evaluation, your dentist will be able to advise if take-home teeth whitening is viable or whether you will have to go with other options such as crowns and dental veneers. When you get the green light, the process of preparing your teeth for bleaching begins. First, the teeth enamel is polished to remove dental decays on the teeth or filling for better results when the shade begins changing. Scaling and polishing are also done on the teeth that are going to be whitened. In the final stage of the examination, your dental structure will be measured and the process of molding bleach trays begins. Bleach trays act like dentine in which help spread the bleaching solution evenly over teeth.
The dentist will call you after a few days or week to go fit your bleach trays. The bleach trays should fit snugly for comfort and also protect the gums when the process of bleaching begins. If there are any adjustments to be made on the bleach trays, it is done on the same day before you leave with your take-home teeth whitening kit. Your doctor will take you through a quick tutorial on how to use the bleaching kit. They will show you how to wipe off excess bleaching material from gums using a toothbrush, cotton roll or cotton buds. You can also use your finger to gently wipe off the bleaching gel.
In addition, the dentist gives you a clear procedure on how to care for your teeth before and after wearing the bleach trays. You are not supposed to eat, drink, or smoke before wearing the bleach trays. Avoid any strong colored foods 48 hours prior to bleaching to ensure the best results. Once the bleach trays are on, you have to stay for 30 to 60 minutes without consuming any food. If some of the bleaching gel falls on the gums, some sensitivity may be felt. Fortunately, your doctor will prescribe a peroxide solution that will help soothe the gums. Moreover, modern day bleaching gels have a high viscosity which helps wipe off the excess before it spills over to the gums. Your dentist will also give instructions on when to wear the bleaching trays. There are bleaching trays that can be worn overnight with the addition of peroxide gel to protect the gums from inflammation.
After two weeks, you have to return to your dentist so they can access the results of the bleaching process. The dentist will take new images of your teeth and compare the shade with the last photos they took. There should be some notable improvement if you followed all instructions to the book. At this point, if you are satisfied with the whitening so far, you can discontinue the bleaching regime. On the other hand, if the dentist feels there is still room for improvement, they will advise you to continue the bleaching for another week or more. A second appointment will be scheduled in which new images will be taken and compared to the last ones. When the results are satisfactory, you will not have to apply the bleaching gel as frequently as before.
Some Downsides to Note Teeth sensitivity is often a common side effect of using take-home whitening kits. There may also be gum discomfort especially if the bleaching trays did not fit properly. You will also have to dedicate an hour of your time every day to go through the bleaching regime. No drinking, eating, or smoking is allowed during the regime, so you may have to contend with hunger pangs and the urge for your favorite tobacco brand.
In-office Teeth Whitening In-office teeth bleaching is the exact opposite of take-home teeth bleaching. Here the dentist does all the heavy lifting for you while you sit back and relax. In-office teeth’s whitening is by far the best procedure for brightening teeth that yields result in seconds. The first doctor appointment is for assessing the degree of discoloration of your teeth. The evaluation is usually faster since no bleaching trays are required. The dentist will then schedule a second appointment in which the whitening will be done. You are instructed on what foods to eat and what to avoid prior to the teeth whitening sessions. Brush and floss your teeth prior to the bleaching session.
During the in-office teeth whitening session, the dentist will begin by cleaning and polishing the teeth to remove any traces of plaque. The dentist then places a gauze and barrier in your mouth that will isolate the teeth and also protect the rest of the mouth from the bleaching gel. The whitening agent is then applied only on the outer surface of the teeth (part of the teeth that is seen when one smiles). In-office whitening procedures use a bleaching gel that is way stronger than what you get in a take-home whitening kit. The strength of this bleaching agent helps it work faster on teeth and in the shortest time possible. However, this bleaching agent is also very corrosive and will damage the gums if left to sit for long. Fortunately, an in-office whitening session only takes 30 to 60 minutes which is a safe window for the bleaching gel to work without causing harm.
Some bleaching gels only require a single application to work while others may require repeated use. In some teeth whitening sessions, the dentist may use a curing laser light to activate the peroxide gel to work faster. When the right shade is achieved, the dentist will rinse off the teeth. It is possible to achieve 10 different shades in just a single sitting. It is up to you to let your dentist know just how white and bright you want your teeth to be. Once an in-house session has been performed, your dentist will put you on a take-home whitening regime. The only difference with the normal take-home bleaching regimes is that you won’t be doing it too often. The bleaching gel used is also mild hence helps maintain the whiteness of the teeth without hurting the gums. This procedure is totally optional and is only recommended if the patient really wants to maintain the new glow.
Downsides In-house teeth whitening is a very expensive procedure compared to take-home whitening kits. The bleaching agents used here are way stronger; therefore, results are realized instantly. You will also be under the professional care of a trained dentist which is safer compared to using a take-home kit. It is because of this special attention that your dentist can charge as much as $700 for a single session. You may also experience some discomfort on your gums during the entire session. This discomfort is partly because of having to sit still with your mouth open for an hour and also because of the bleaching agent. Dentists mitigate the discomfort on the gums with peroxide and fluoride gels.
Whether you choose in-house versus take-home teeth whitening solution will depend on several things. The above guide should help make or break the decision on which teeth bleaching regime to go for. Always consult a professional dentist to help you make an informed decision. Downsview Dental Care provides teeth whitening and a wide range of other cosmetic dentistry services in North York. They offer customized teeth whitening treatments that can help you illuminate all the features of your smile. Reach out to their office to schedule a consultation. Find out more at - https://www.downsviewdentalcare.com/appointments/