Download
1 / 12
390 likes | 881 Views
This document provides information to configure Kepware KEPServerEX HMI to<br>communicate with a DH network from a computer with an ANC-120e USB to Data<br>Highway Plus adapter or ANC-100e Ethernet to Data Highway Plus adapter.

E N D
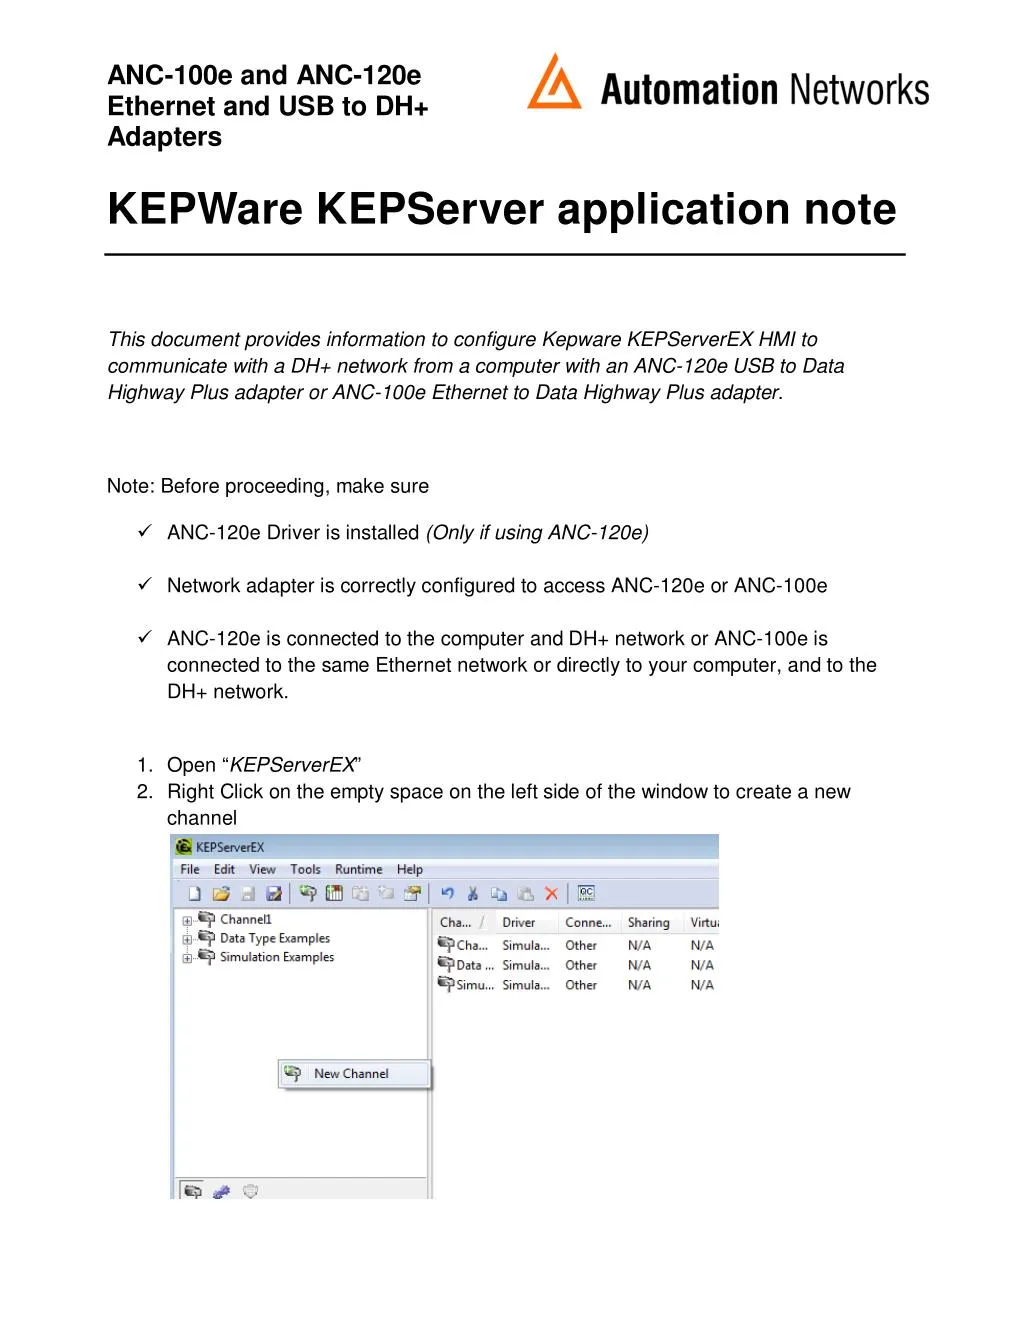
ANC-100e and ANC-120e Ethernet and USB to DH+ Adapters KEPWare KEPServer application note This document provides information to configure Kepware KEPServerEX HMI to communicate with a DH+ network from a computer with an ANC-120e USB to Data Highway Plus adapter or ANC-100e Ethernet to Data Highway Plus adapter. Note: Before proceeding, make sure ANC-120e Driver is installed (Only if using ANC-120e) Network adapter is correctly configured to access ANC-120e or ANC-100e ANC-120e is connected to the computer and DH+ network or ANC-100e is connected to the same Ethernet network or directly to your computer, and to the DH+ network. 1. Open “KEPServerEX” 2. Right Click on the empty space on the left side of the window to create a new channel
ANC-120e and ANC-100e USB and Ethernet to DH+ Adapters 2 3. Name the new channel as you prefer (Channel2 in this example) and click “Next” 4. From the “Device driver” dropdown list select “Allen-Bradley ControlLogix Ethernet” and click “Next”
ANC-120e and ANC-100e USB and Ethernet to DH+ Adapters 3 5. From the “Network Adapter:” dropdown list select the ANC-120e or the Network adapter connected to the same Ethernet network than ANC-100e and click “Next” 6. Use the default settings for “Write Optimizations” options and click “Next”
ANC-120e and ANC-100e USB and Ethernet to DH+ Adapters 4 7. Use the default settings for “Non- Normalized Float Handling” and click “Next” 8. Click “Next”
ANC-120e and ANC-100e USB and Ethernet to DH+ Adapters 5 9. Review the “Summary” and click “Finish” 10. Click on the new Channel to select it and then click on “Click to add a device”
ANC-120e and ANC-100e USB and Ethernet to DH+ Adapters 6 11. Under “Device Name”, enter a name meaningful for you and click “Next” 12. From the “Device Model:” dropdown list, select “DH+ Gateway: SLC 5/04” and click “Next”
ANC-120e and ANC-100e USB and Ethernet to DH+ Adapters 7 13. Under “Device ID”, enter the following path: <IP of ANC adapter>, 1, 1. A. Target_DH+_Node_number Please notice that there are “,” and “.” in the path When you are finished with the path, click “Next” 14. Use default values for “Scan Mode” and click “Next”
ANC-120e and ANC-100e USB and Ethernet to DH+ Adapters 8 15. Use defaults values for “Timing” and click “Next” 16. Use defaults values for “Auto-Demotion” and click “Next”
ANC-120e and ANC-100e USB and Ethernet to DH+ Adapters 9 17. Use default values for “Database Creation” and click “Next” 18. Use default values for “ENI DF1/DH+/CN Gtwy Communications Parameters” and click “Next”
ANC-120e and ANC-100e USB and Ethernet to DH+ Adapters 10 19. Use default values for “SLC Slot Configuration” and click “Next” 20. Read the “Summary” and click “Finish”
ANC-120e and ANC-100e USB and Ethernet to DH+ Adapters 11 21. Click on the recently created device under our channel to select it and then click on “Click to add a static tag” 22. Enter a meaningful name for the tag in the “Name:” field 23. Enter a known address of your PLC in the “Address:” field (N7:0 for our example) 24. Select the corresponding “Data type:” from the dropdown list and click “OK” 25. With this, you can test the connection to your PLC on DH+ using the Quick OPC Client
ANC-120e and ANC-100e USB and Ethernet to DH+ Adapters 12 26. In our example, N7:0 is known to hold the value 1616 Use Tools -> OPC Quick Client Find your tag in the list of items and confirm that you get the correct value. This concludes this application note.